
Conditional Flows
Build automated pipelines with Conditional Flows — phases and parallel tasks, IF/THEN conditions, variables, retries, delays, notifications, schedules, and run history.
Flows allow you to build automated data pipelines with conditional logic, branching, retries, and robust error handling. You can define flows that react to the outcome of previous steps, dynamically control their next action, or even skip tasks entirely.
Looking for Legacy Flows? To migrate an existing Legacy Flow to a new Conditional Flow, see the Migration Guide.
Access Flows
Section titled “Access Flows”Navigate to Conditional Flows > Create Flow. You’ll land directly in the Builder tab, where you can start creating your first flow; the other tabs — All Runs, Schedules, Notifications, and Versions — cover monitoring and automation and are explained later in this documentation.
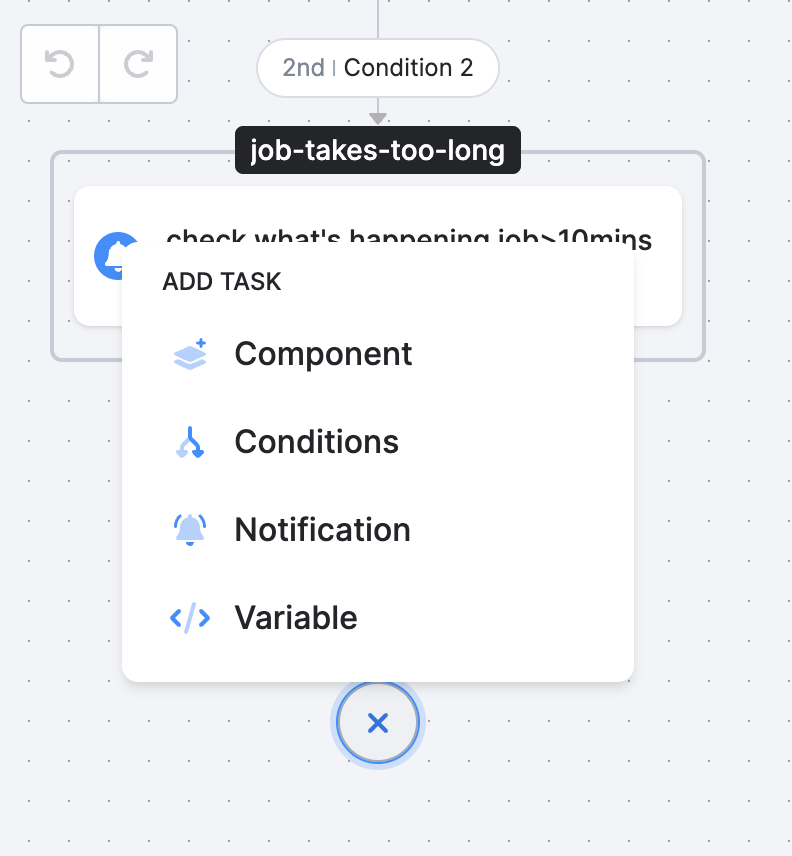
Use the plus icon (+) on the canvas to add a task to a phase. The Add Task menu offers three task types: Component, Notification, and Variable. Conditions are not tasks — they control which phase runs next and are configured on the transitions between phases.
Build the Flow
Section titled “Build the Flow”Phases and Tasks
Section titled “Phases and Tasks”- Phases group multiple tasks (components, variables, notifications).
- Tasks within a phase run in parallel.
- After all tasks in a phase complete, based on conditions it is determined which phase will be executed next.
- You can define multiple condition rules - only the first matched condition is executed.
- How to end a flow: You can stop a flow at any point using the End Flow option in the ELSE path of a conditional condition. This is especially useful when none of your IF conditions are met and you want to avoid continuing to another phase.
Execute Tasks in Parallel
Section titled “Execute Tasks in Parallel”You can group multiple tasks within one phase. These tasks then run independently in parallel, speeding up the execution. Phases execute sequentially, while tasks within a single phase run in parallel. If you have multiple data source connectors, you can include them all in a single phase, allowing them to run simultaneously.
The same applies to data destination connectors. Also, transformations independent of the connectors can be grouped within the same phase. Note that this does not reduce costs, as each job consumes credits independently.
You can also set up parallelization within a component (configuration), directly in the component’s UI for row-based components like database source connectors using the same credentials to run multiple tables concurrently.
Storage jobs have a parallel limit. They are typically capped at 10 parallel jobs but the Keboola Support team can help you adjust this.
Control Task Execution
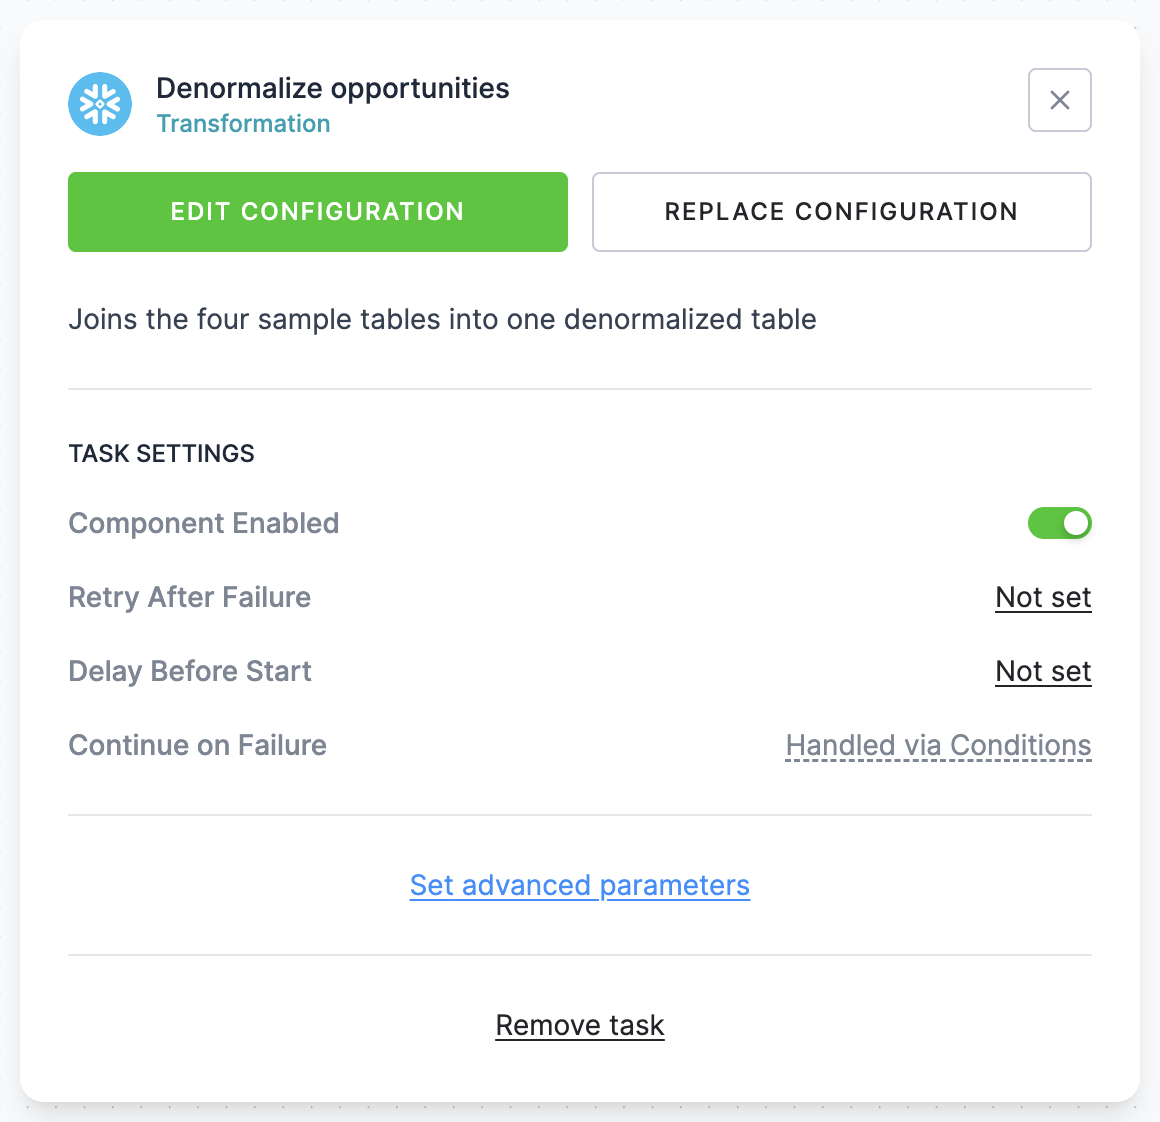
Section titled “Control Task Execution”Select a task in the Builder to open its settings.
-
If you need to temporarily skip something, disable the task. The task will then be excluded from the flow.
-
Failure handling is expressed through conditions instead of a “Continue on Failure” toggle — you can branch on task or phase status (e.g.,
if status == 'error' then ...) to send notifications, run fallback logic, or end the flow. To let selected tasks fail while the rest of the phase must succeed, use the Continue on Failure condition subject. See also Retry for automatic retries of failed tasks. -
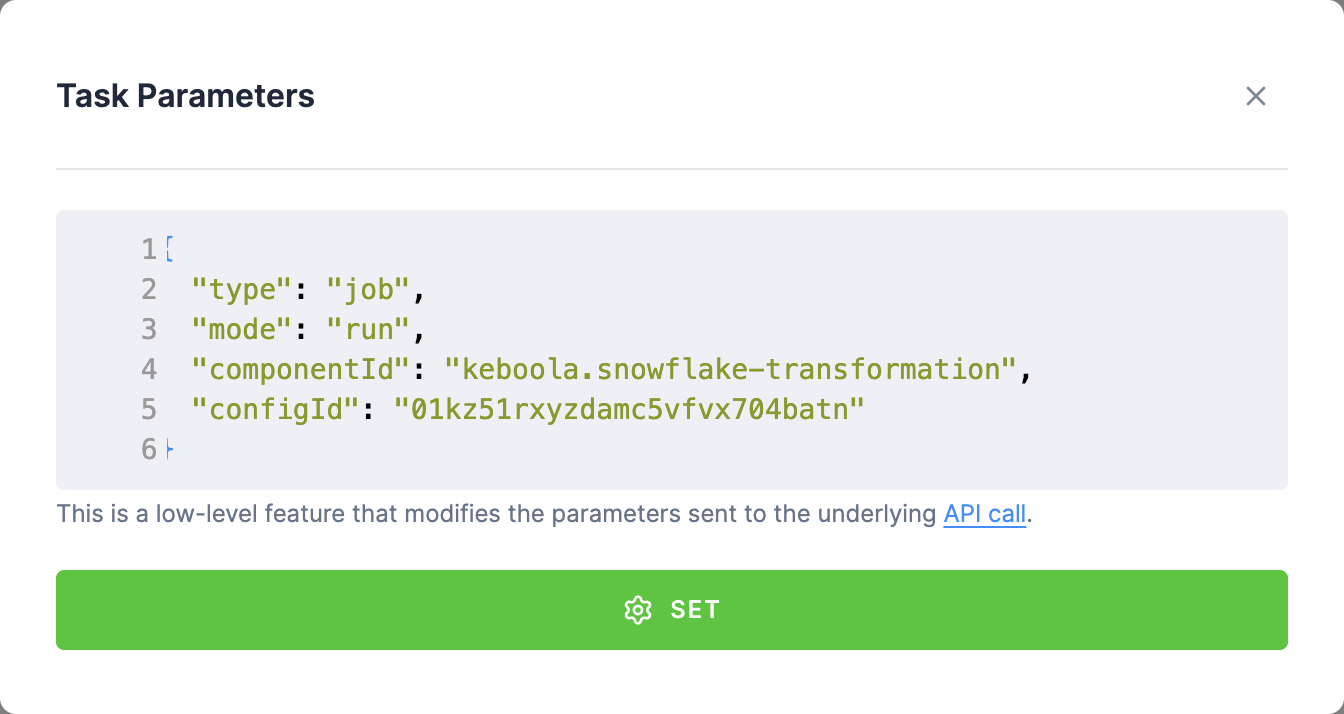
To modify the parameters sent to the underlying API call, you can set Task Parameters. Select the task and click Set advanced parameters. When finished, click Set. A common use is overriding a variable for that one task.
Conditions
Section titled “Conditions”1. Conditional Logic (IF statements)
Section titled “1. Conditional Logic (IF statements)”Control the flow of execution based on conditions like:
- Task or phase status - such as success, failure, or warning. This is commonly used for handling errors, creating fallback branches, or sending alerts.
- Variable values (e.g. thresholds, results from previous tasks).
- Date and time logic (e.g. run only on Mondays, last day of the month).
- Number of Output Tables - control the flow based on how many output tables a task produces.
- Duration of Task - condition to trigger actions depending on how long a task runs. This is useful for detecting anomalies (e.g., unusually short or long runtimes).
Each of these can be evaluated for a single task, a whole phase, all or any task in a phase, or any task in the whole flow - see What the Condition Compares.
Evaluation proceeds from top to bottom, and once a condition is true, the remaining conditions are ignored - even if others would also evaluate to be true.
Example: If you define 5 conditions and both the 3rd and 5th conditions are valid, only the 3rd will be used.
2. Logical AND / OR between conditions
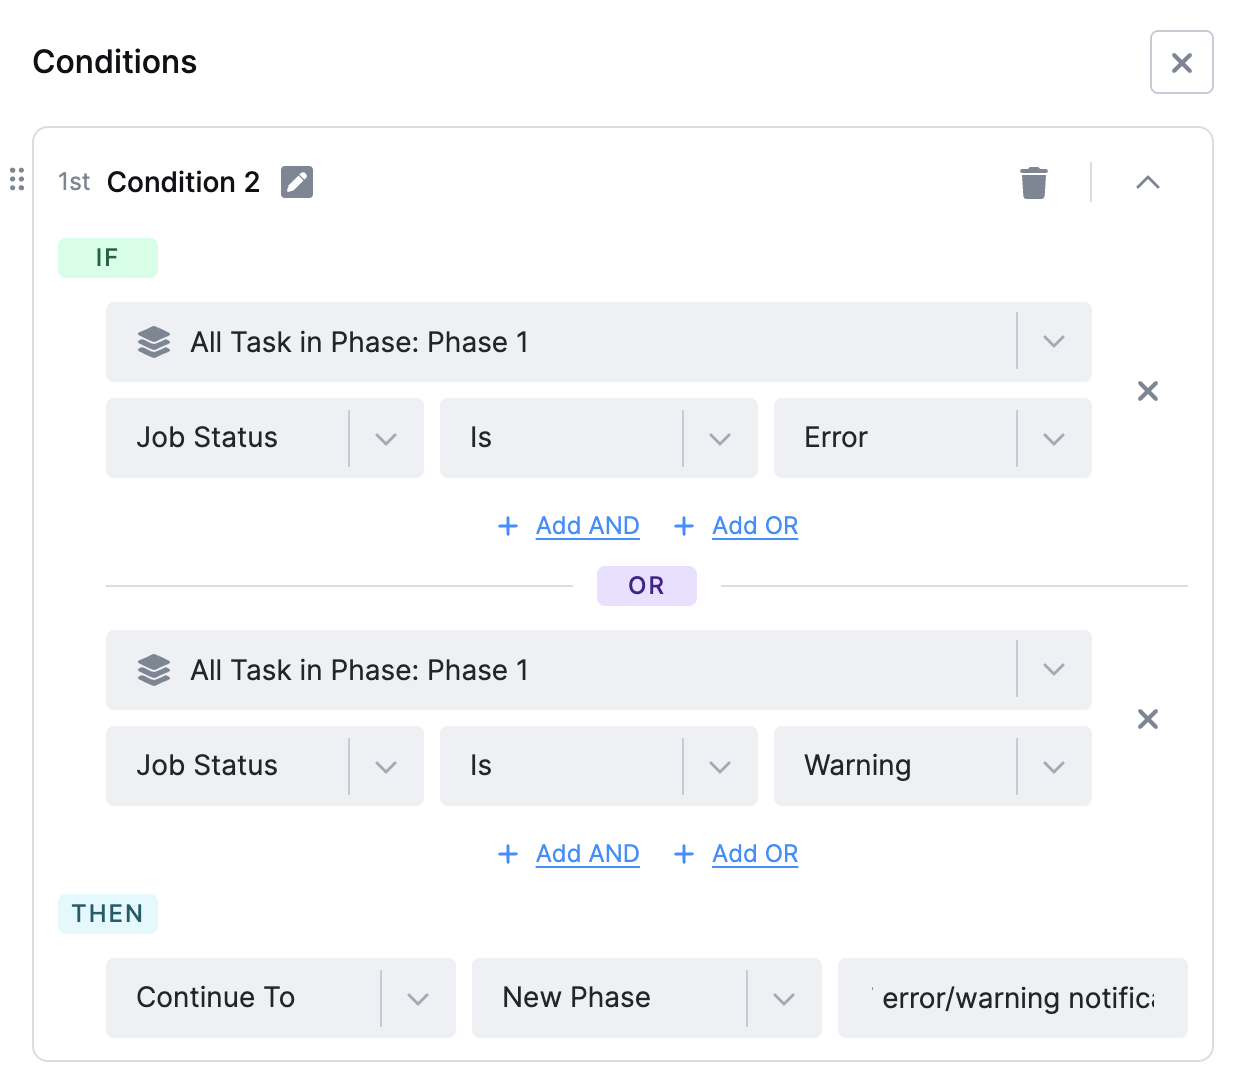
Section titled “2. Logical AND / OR between conditions”You can use logical operators (AND) and (OR) to combine multiple statements within a single condition statement.
- Use (AND) when all statements must be true for the expression to pass.
- Use (OR) when any one statement being true is enough.
3. What the Condition Compares (Subject)
Section titled “3. What the Condition Compares (Subject)”Every statement starts with a subject - the thing the flow looks at. The picker offers two tabs: Phases / Tasks and Variables (see Using Variables in Conditions).
In the Phases / Tasks tab you can choose:
| Subject | What it evaluates |
|---|---|
| Any Task in the Flow | A flow-level row above the phase list. The statement passes when at least one already finished task anywhere in the flow matches. |
| phase > Whole Phase Status | The resulting status of the whole phase. |
| phase > All Tasks in Phase | Passes only when every task in that phase matches. |
| phase > Any Task in Phase | Passes when at least one task in that phase matches. |
| phase > Continue on Failure | Passes when every task in that phase succeeded, except the tasks you explicitly allow to fail. See Continue on Failure. |
| phase > task | A single field from that task’s job result (browse the result tree, as with Dynamic Value variables). |
For the aggregated subjects (Any Task in the Flow, All Tasks in Phase, Any Task in Phase), the field is picked from a short list that applies to any task: Job Status, Job Duration, Error Message, Count of output tables, Sum of imported rows, and Min of imported rows.
When you pick a specific phase or task, you can only reference phases that run before the condition (plus the condition’s own phase). Any Task in the Flow needs no phase at all, so it also covers tasks in parallel branches that already finished - not just the ones directly upstream.
The typical use case for Any Task in the Flow is a single flow-level error branch - “if any task in the flow ended with an error, send a notification” - instead of repeating an Any Task in Phase statement for every phase.
JSON equivalent (useful when authoring a flow as a template or via the API) - the aggregated subjects wrap the inner statement, which uses * as the task:
{ "type": "operator", "operator": "ANY_TASKS_IN_ANY_PHASE", "operands": [ { "type": "operator", "operator": "EQUALS", "operands": [ { "type": "task", "task": "*", "value": "job.status" }, { "type": "const", "value": "error" } ] } ]}The per-phase variants use the same shape with the ANY_TASKS_IN_PHASE or ALL_TASKS_IN_PHASE operator plus a "phase": "<phase-id>" property.
4. Continue on Failure
Section titled “4. Continue on Failure”Continue on Failure is a subject of its own, picked per phase next to All Tasks in Phase and Any Task in Phase. It expresses “these tasks may fail, all the others must succeed” - the equivalent of the Continue on Failure toggle known from Legacy Flows.
After selecting it, pick the tasks that are allowed to fail in the All tasks of the phase must succeed, except selector. The statement then passes when every other task in the phase finished successfully; a task blocks the branch only if it did not succeed and is not on the list. Leave the list empty to require that the whole phase succeeds.
The condition is summarized as All tasks in Extract Data succeeded / except My GitHub.
JSON equivalent - the operator takes no operands, because the statuses are fixed. It carries the ids of the tolerated tasks instead:
{ "type": "operator", "operator": "CONTINUE_ON_FAILURE", "phase": "8888", "tasks": ["456", "789"]}Task ids that no longer belong to the phase (for example a deleted or disabled task) are ignored, so the condition keeps working when the phase’s tasks change.
Variables
Section titled “Variables”Variables let you store and reuse values — like dates, task results, or custom inputs — throughout your flow. Add one in a phase with the + icon → Variable; a variable holds either a Static Value (fixed text or number) or a Dynamic Value computed at run time from a task result, a phase, or a built-in function. Later conditions can then compare the variable’s value, and component jobs receive flow variables that match their own variable names.
For the full guide — static and dynamic values, JMESPath aggregations, the COUNT and DATE functions, and how variables reach component jobs — see Flow Variables. For the configuration variables that flow variables can drive, see Variables.
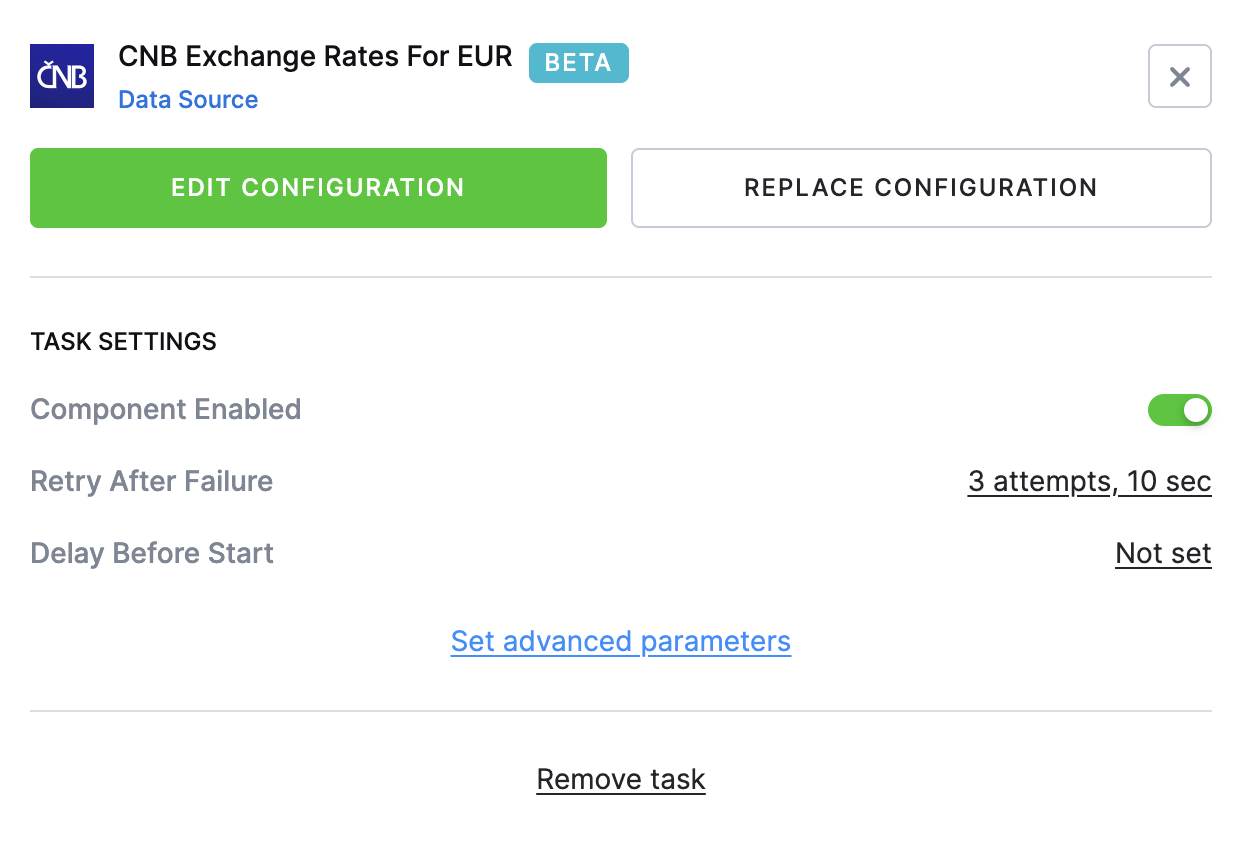
You can retry failed tasks automatically and optionally choose to retry based on specific failure messages.
By default, the system retries up to 3 times with a 10-second delay between attempts. Both the number of attempts and the delay can be customized to fit your workflow.
To access the retry settings, click on task to open the configuration.
Example: If you set 3 retries with 10 seconds delay between attempts, it means the task will run 4x total.
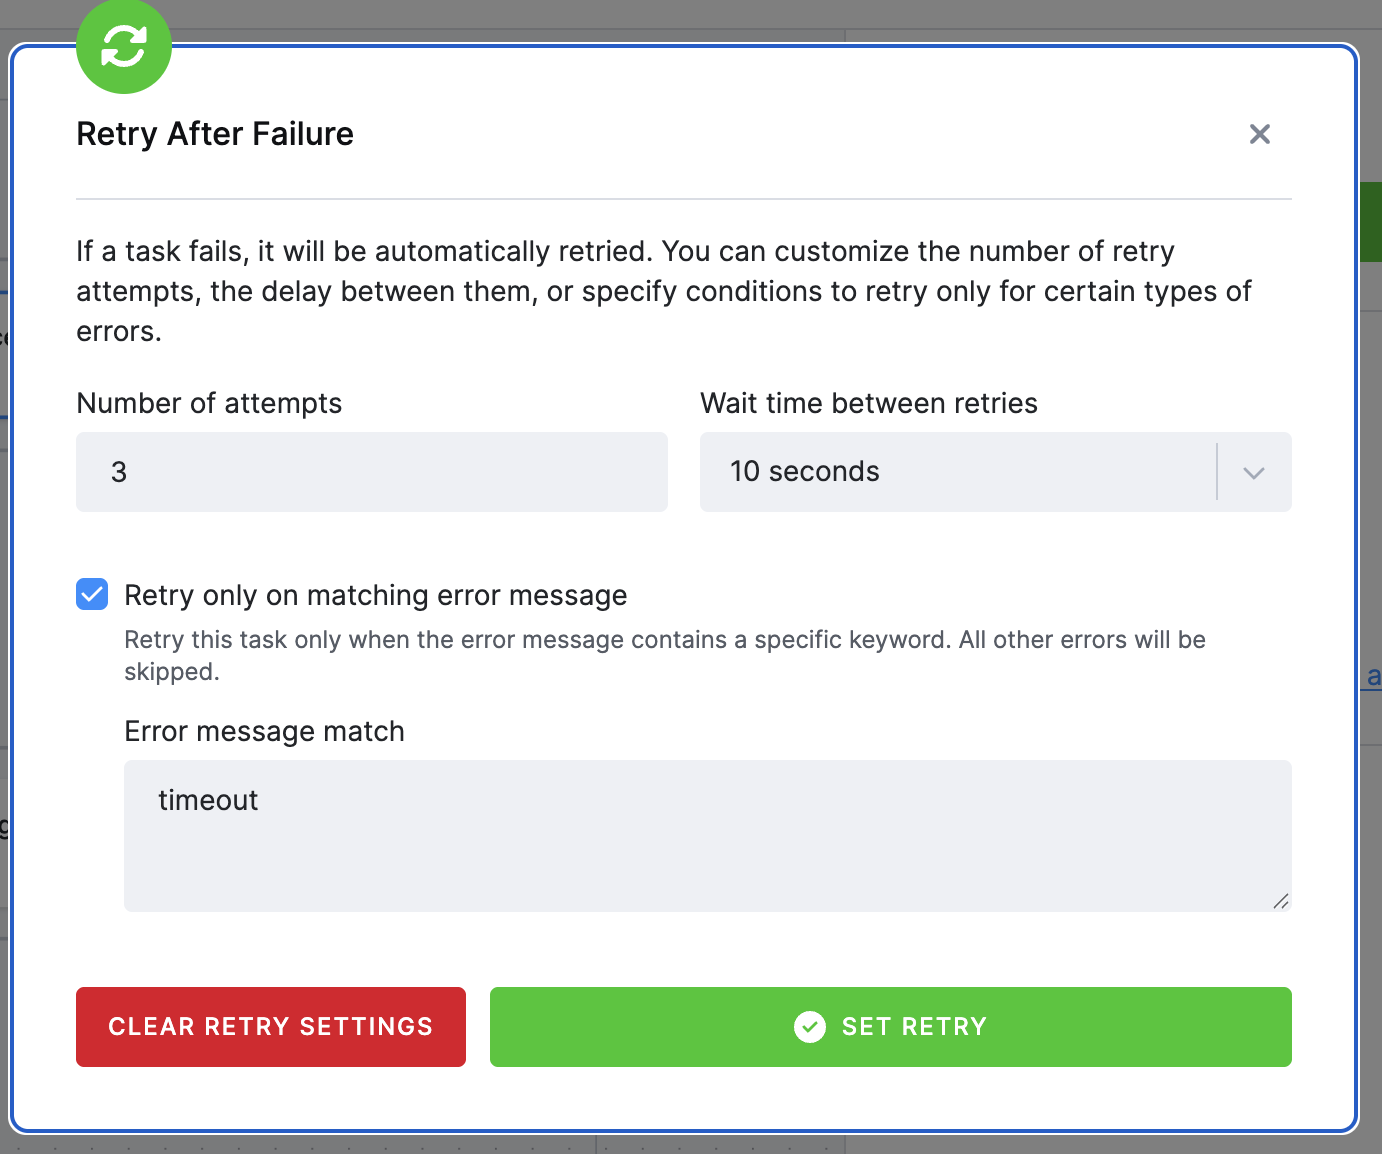
Problem: Pipeline fails due to API timeout.
Solution: Configure retry logic for that task.
Delay between tasks
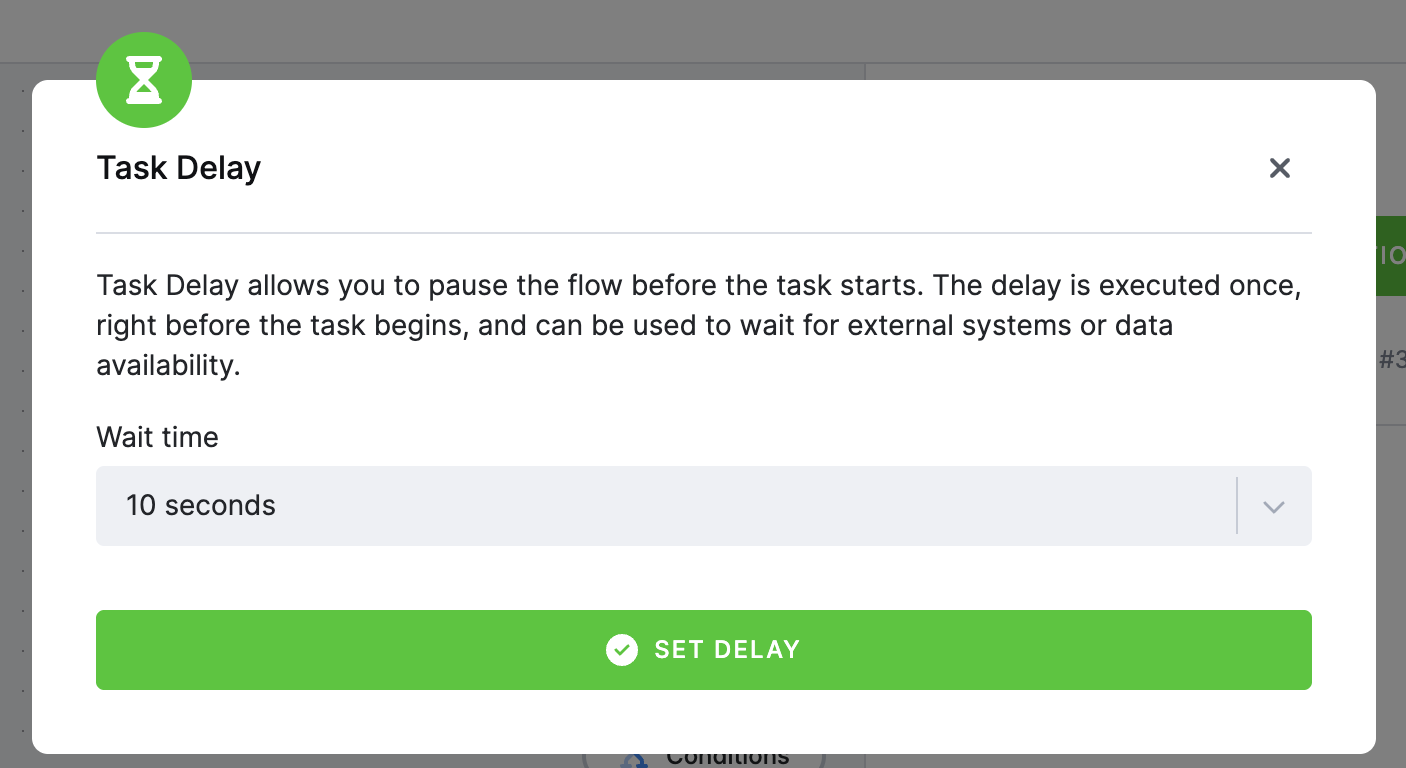
Section titled “Delay between tasks”Introduce a delay (in seconds) before executing a task - useful for waiting for external systems or data availability.
To access the delay settings, click on task to open the configuration.
Notifications
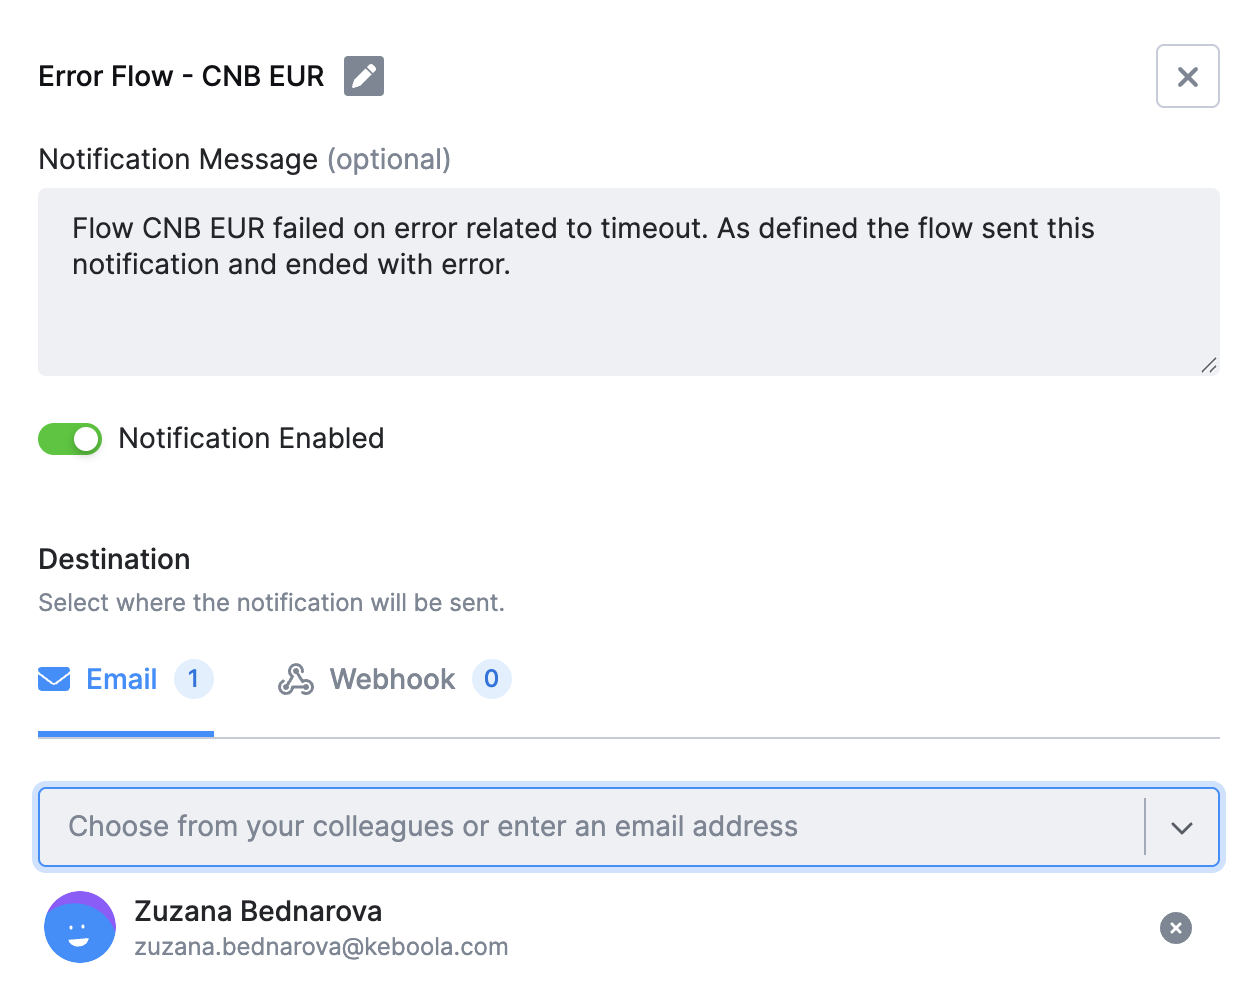
Section titled “Notifications”Send alerts directly from the flow and conditions using email(s) or webhook(s). Use the plus icon (+) and select Notification.
You can also create the notification inside of condition as a New Phase, name it and once the condition is all set, use the Use the plus icon (+) and select Notification.
Run the Flow
Section titled “Run the Flow”Click Run flow in the flow header to run the whole flow. The arrow next to the button offers the partial runs below. All of them use the saved configuration, so save or reset your changes first.
Run selected tasks
Section titled “Run selected tasks”Use this when only a part of the flow needs to run — for example after fixing one transformation, without waiting for the extractors again.
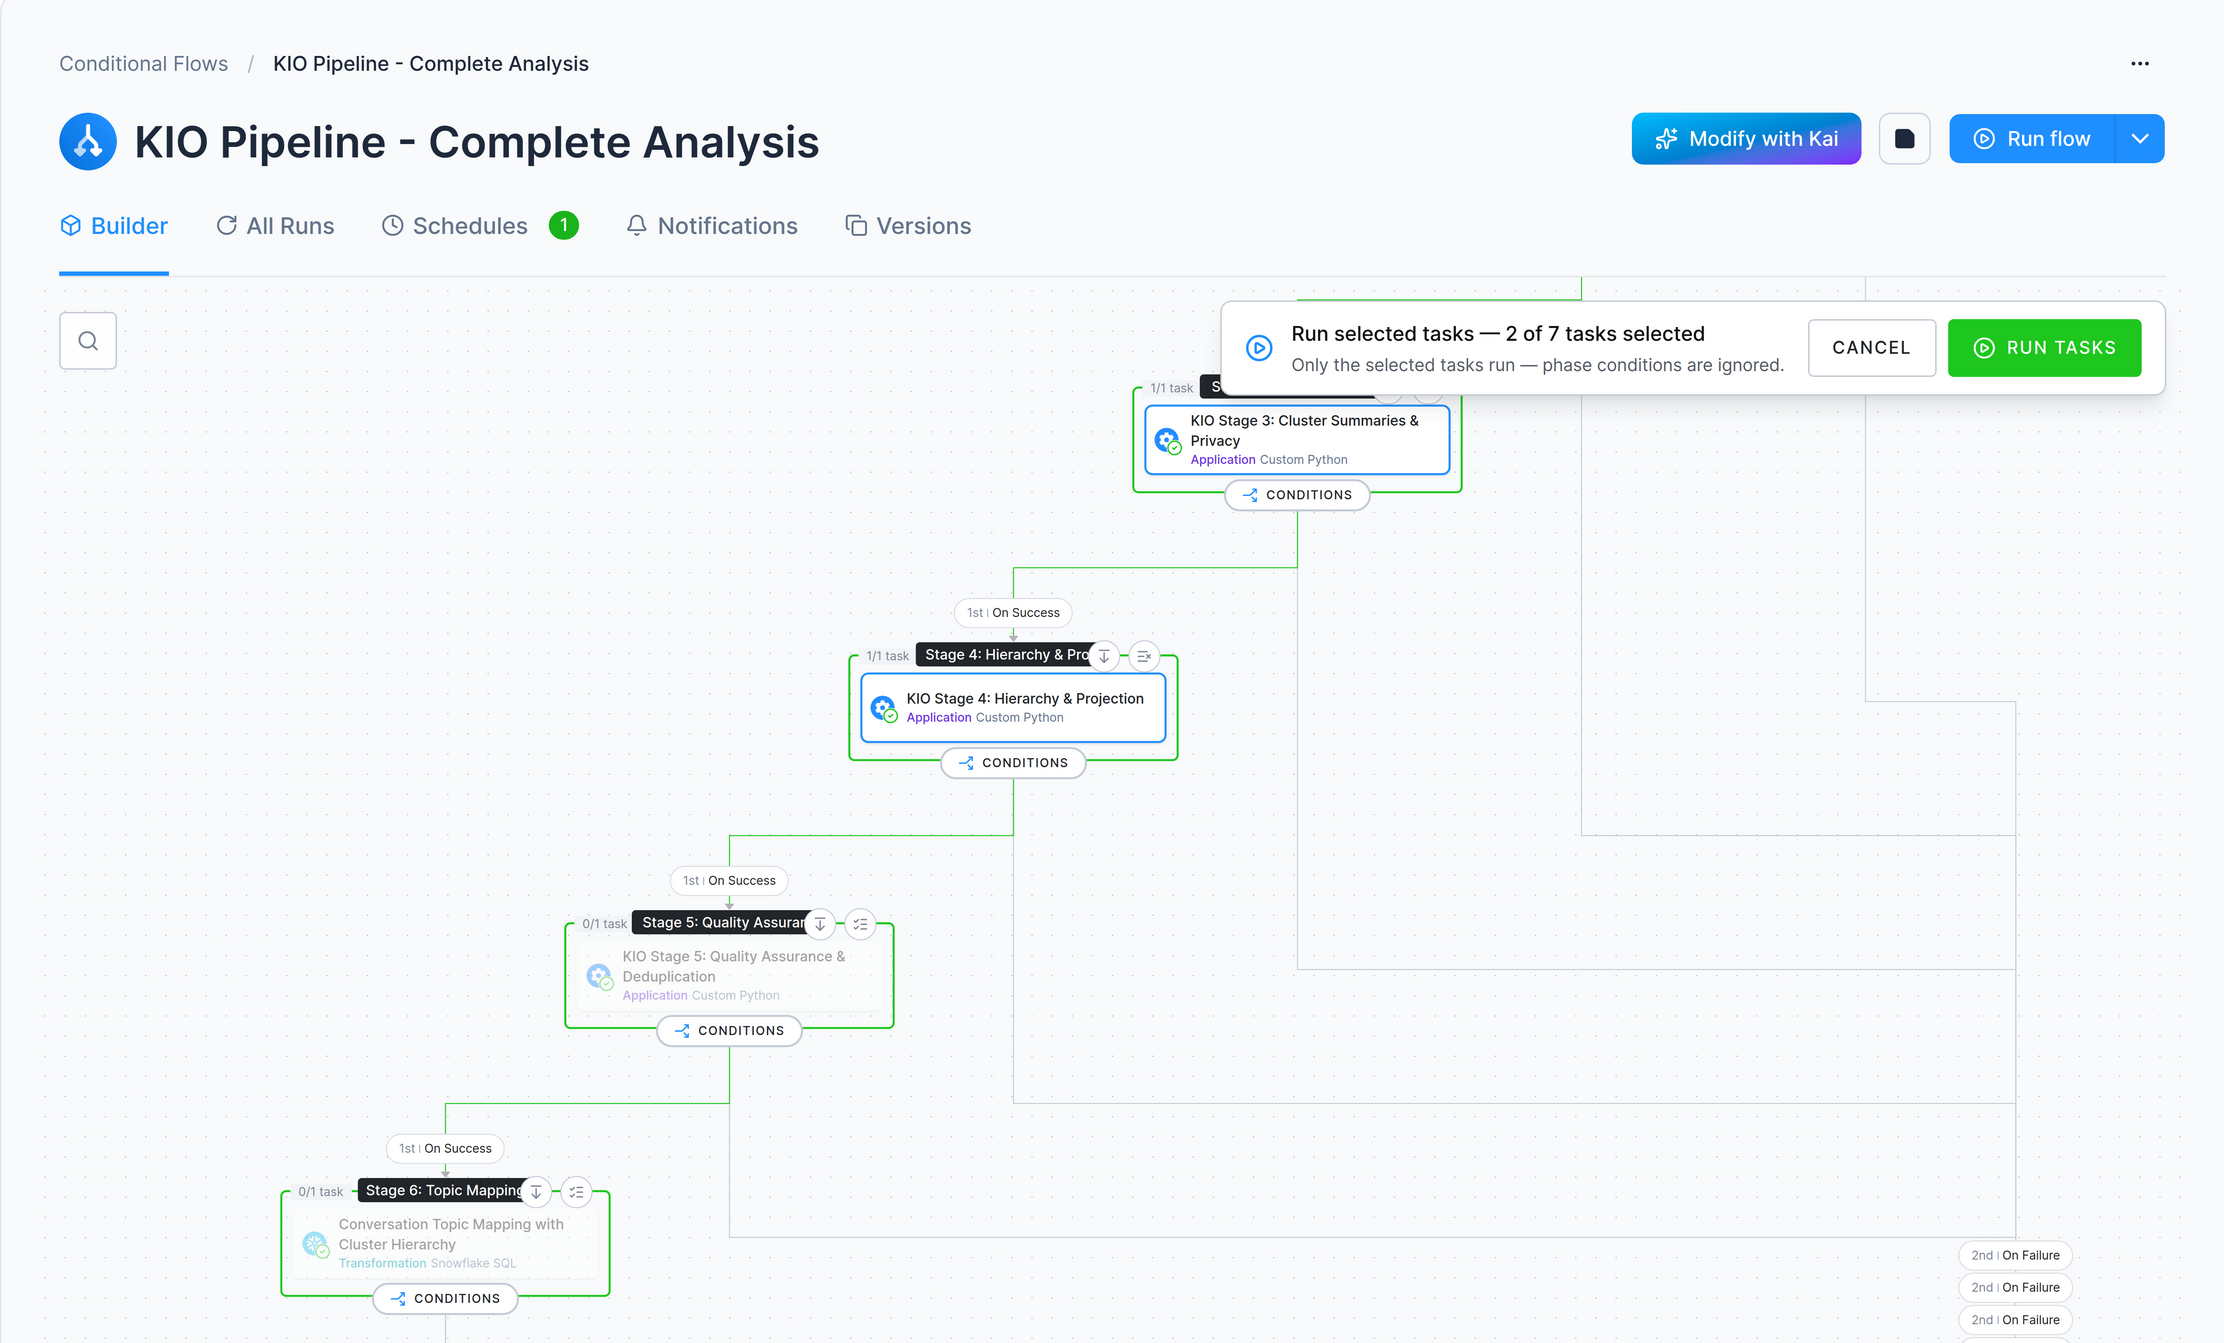
- Open the Builder tab and choose Run selected tasks from the Run flow button.
- Click the tasks you want to run. The canvas is read-only while selecting; each phase shows how many of its tasks are selected and offers Select all tasks in this phase and Select this phase and everything after it.
- Click Run tasks. Cancel or
Escleaves the mode without running anything.
What runs:
- Only the selected tasks. Conditions are ignored — the selected phases run one after another, including phases in different branches of a condition, and a phase several branches lead into runs only once. Phases with nothing selected are skipped.
- Tasks selected within one phase still run in parallel, as they do in a normal run.
- Disabled tasks and tasks with a missing, invalid, or deleted configuration cannot be selected.
- A failed task does not stop the run — every selected task runs, and the flow’s status is the status of its last phase, so check the individual tasks in the run.
Re-run failed tasks
Section titled “Re-run failed tasks”After a failed run, Re-run failed tasks appears in the same Run flow button, and on the flow’s job detail in Jobs. Tasks that already finished successfully are skipped and their results reused; the rest re-run with the current flow configuration.
Run a single phase or task
Section titled “Run a single phase or task”Hovering over a phase or a task reveals a run icon that runs just that phase or task in isolation — no other phase is entered and no conditions are evaluated.
Schedule and Automate
Section titled “Schedule and Automate”Open the Schedules tab in your flow and click Create Schedule. A flow can have several schedules; they work independently, and the flow runs when any one of them triggers. Each schedule has its own toggle, so you can turn one off without deleting it.

A schedule is either Date & Time or Triggered. For Date & Time, pick one of the predefined intervals (every 15 minutes, every hour, once a day, once a week, end of month) or set your own, then click Set Up Schedule. The dialog works in UTC and previews the next runs before you commit.
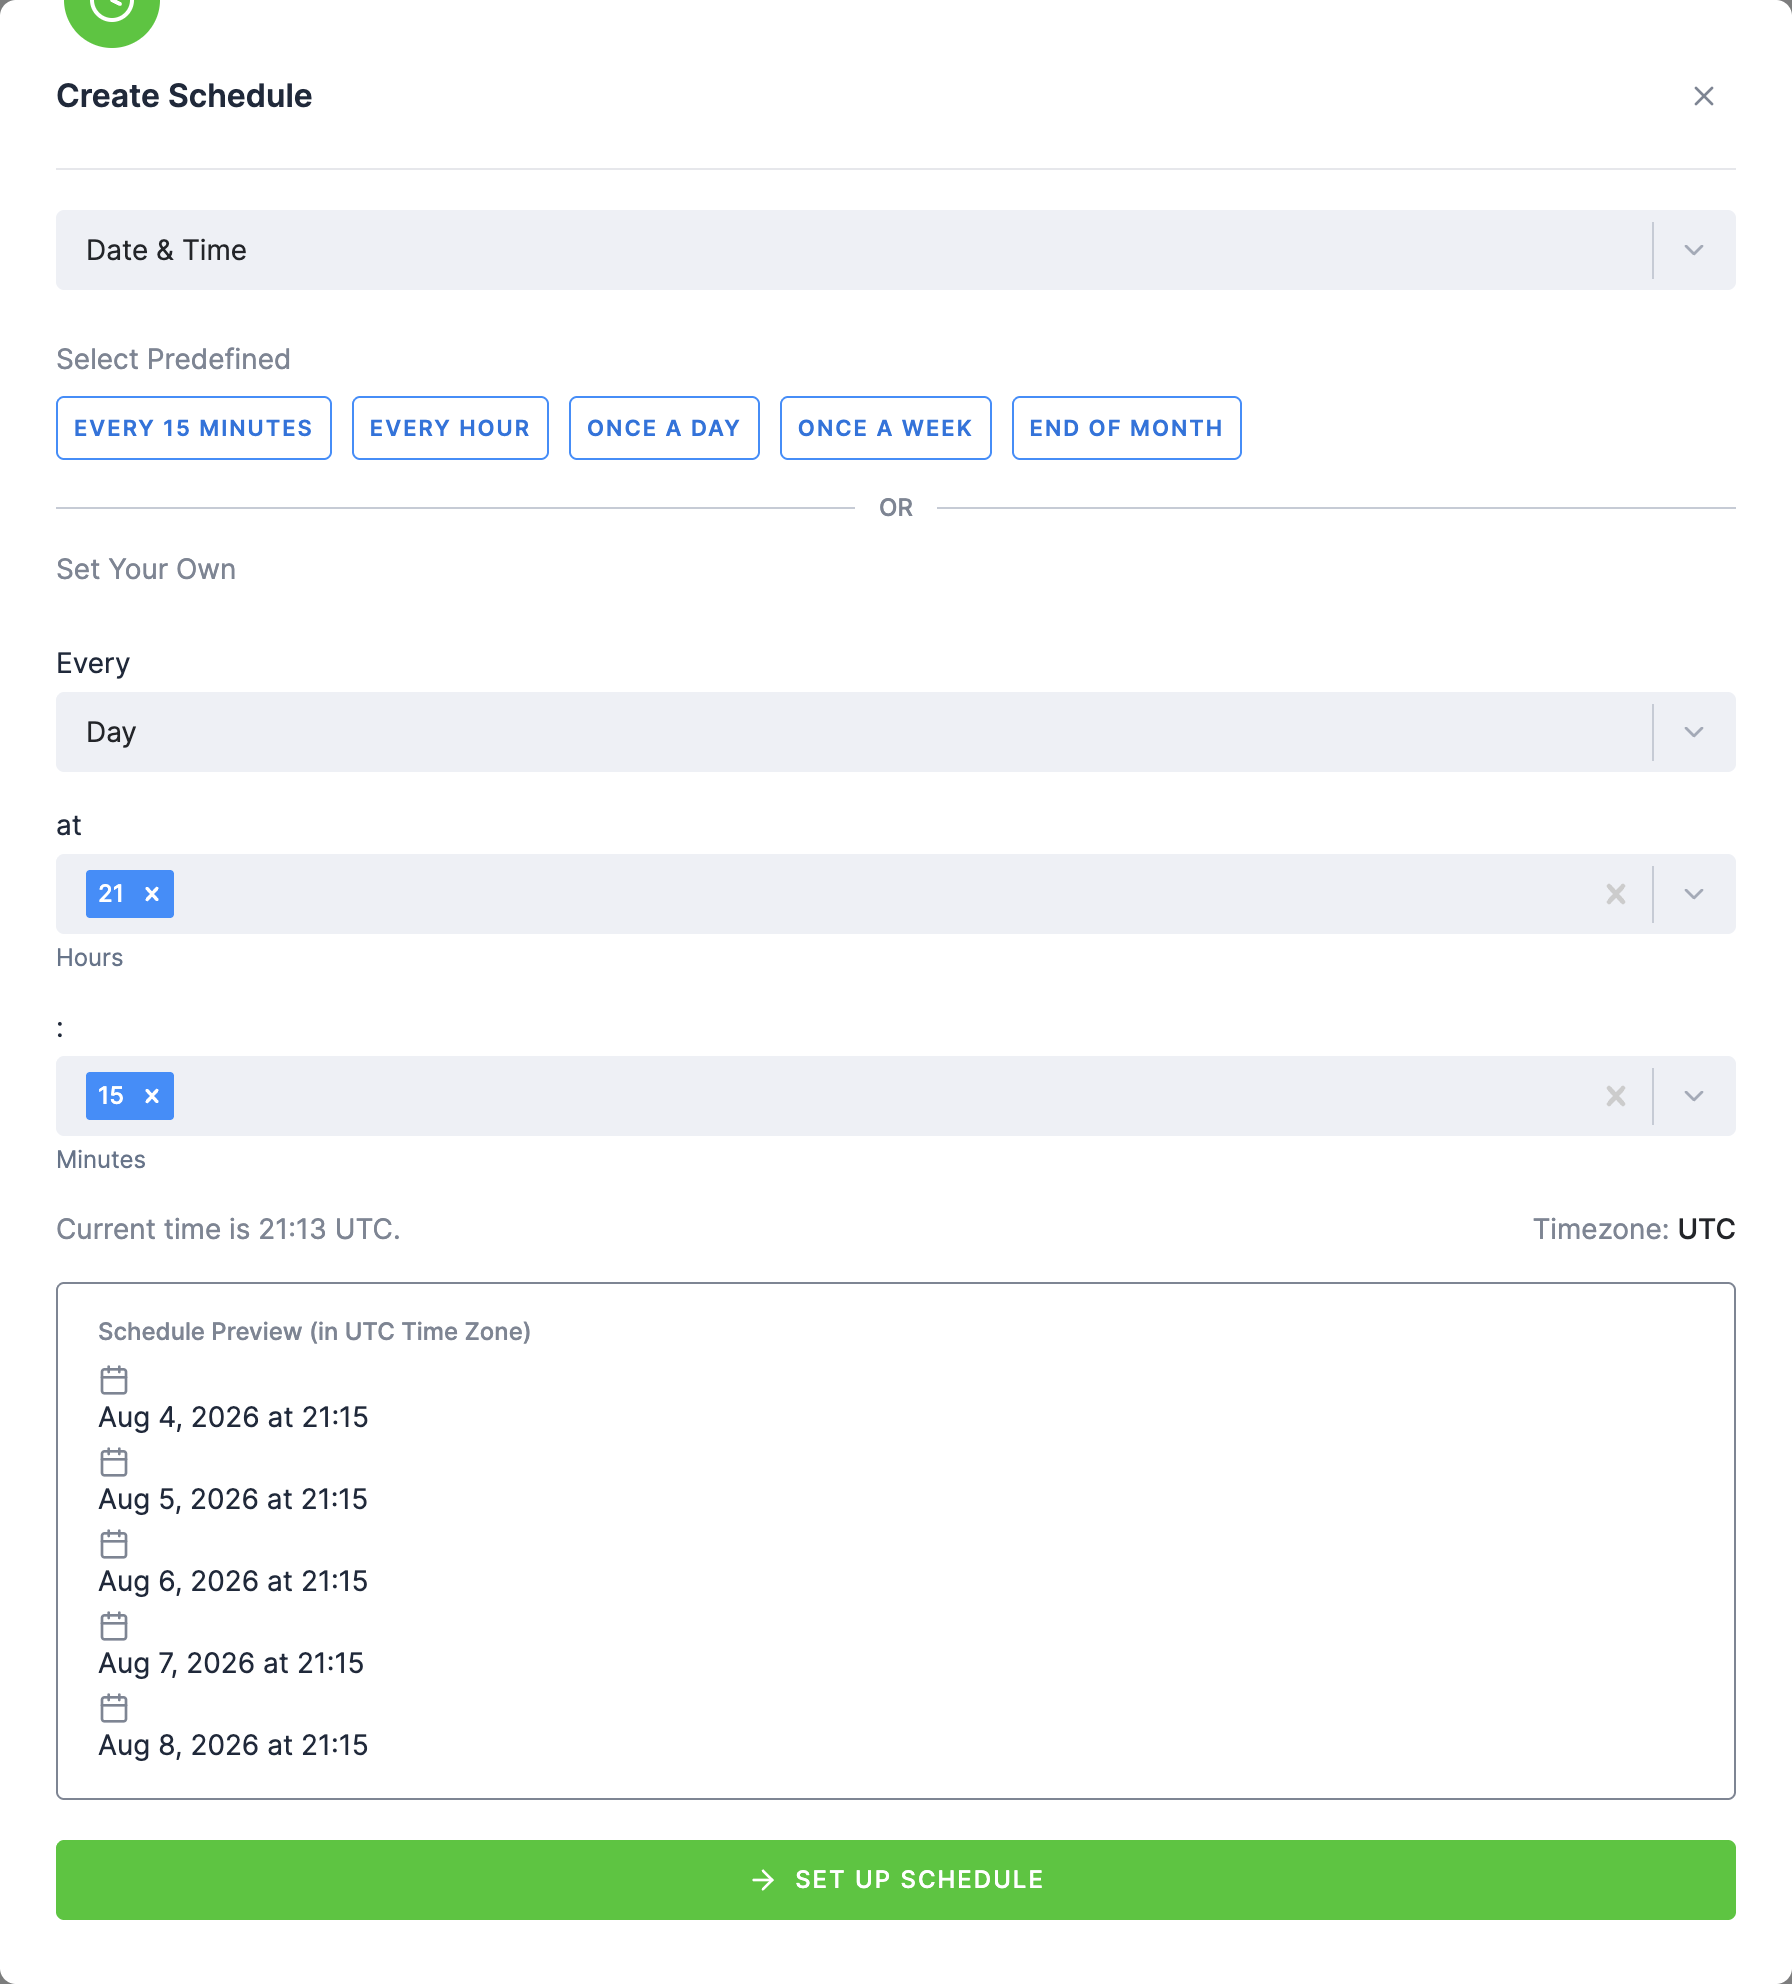
Scheduling: Commonly, flows are set to run at specific times. To avoid busy periods in a shared environment, consider scheduling slightly off-peak for smoother execution.
Triggers: Set flows to automatically start when certain Storage tables are updated (ideal for managing dependencies across projects). Your projects will stay synchronized and run efficiently.
Note on Triggers: If table updates happen during the cool-down period, the trigger is suppressed, but the tables are marked as ready. Therefore, if all configured tables are updated during the cool-down period, the flow is not scheduled at that time — but once the cool-down expires and any table is updated (causing the trigger to be evaluated), the system recognizes that all tables are already up to date and runs the flow immediately.
Check Run History
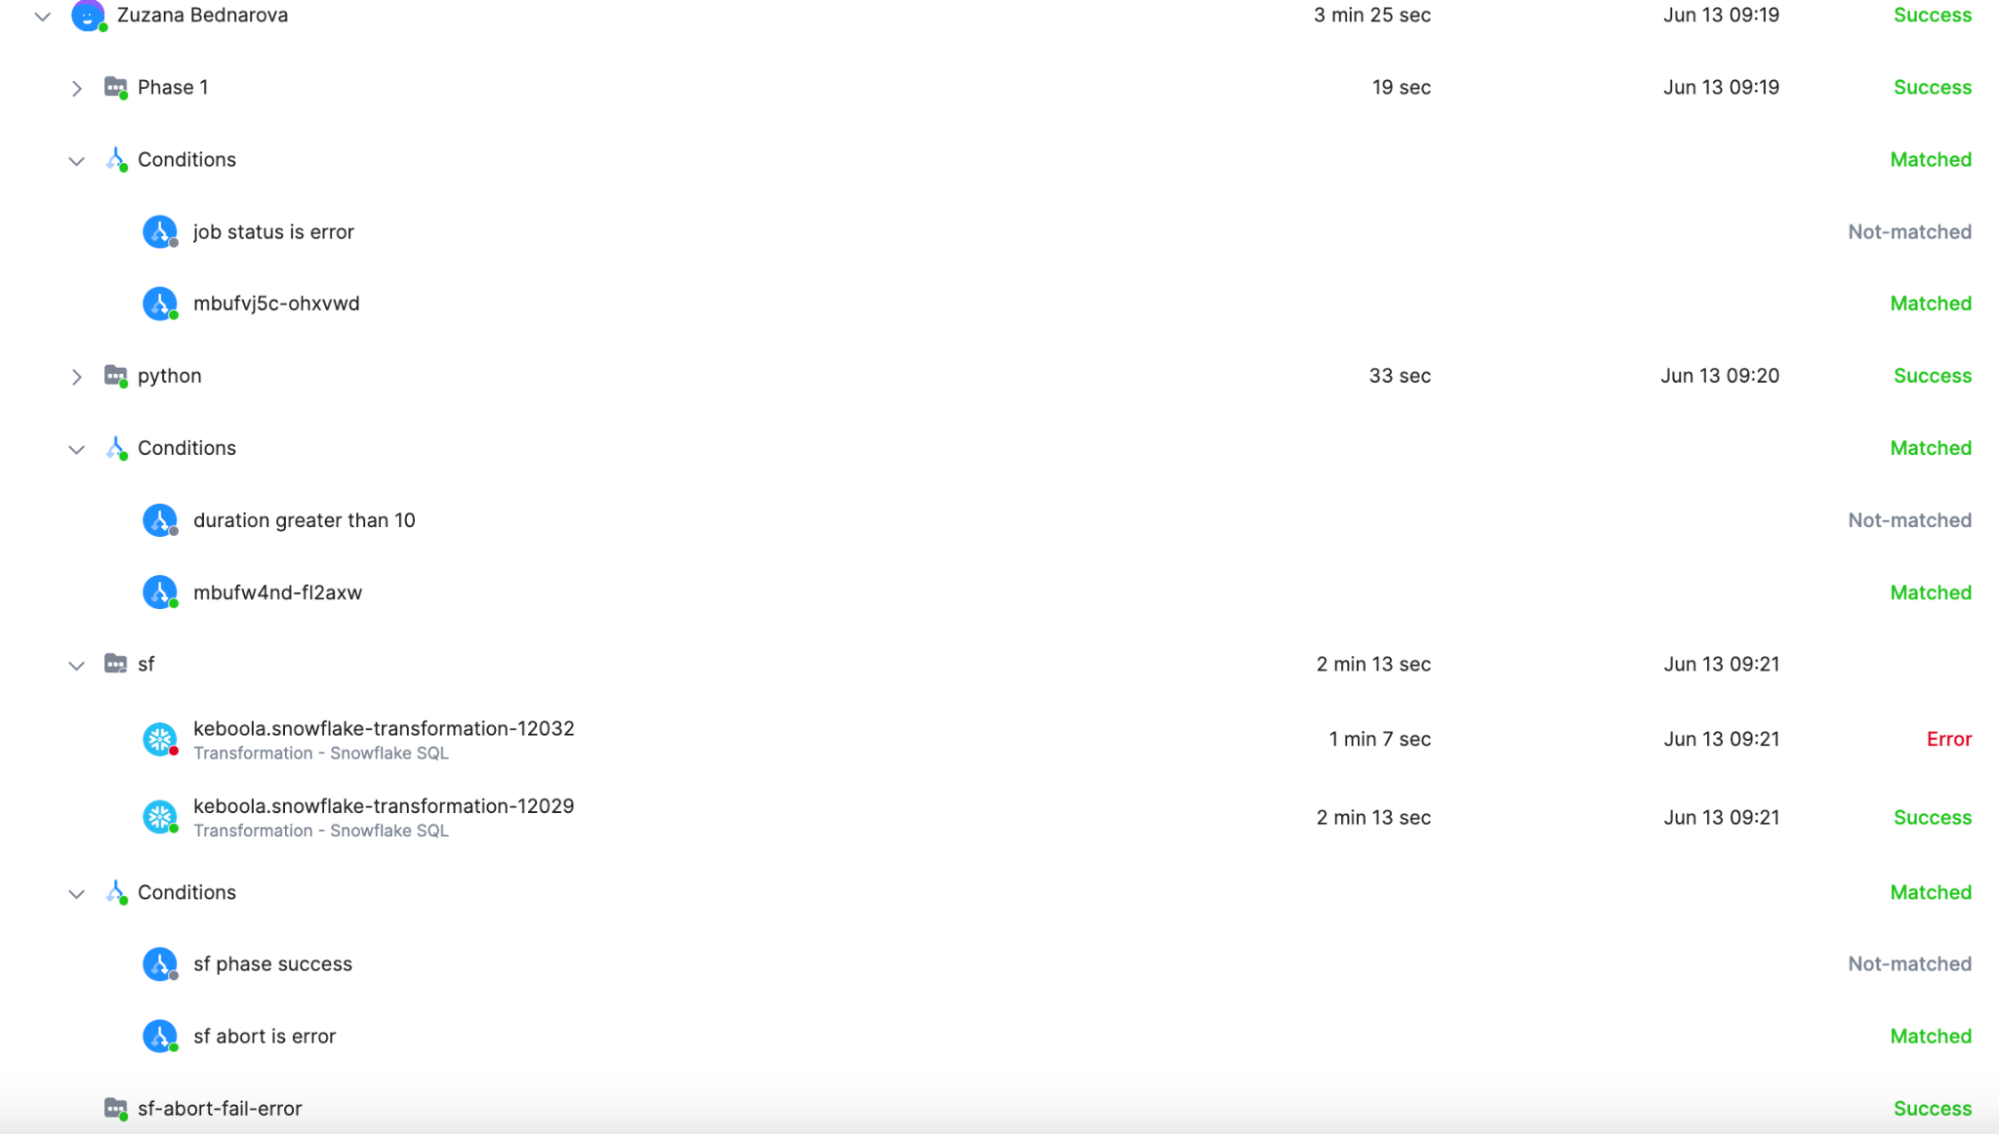
Section titled “Check Run History”Once your flow is running, you can track its progress and debug issues using the All Runs tab.
In this tab, you will find a complete list of all past executions of your flow. Click into any run to see:
- Which phases were executed
- Which tasks ran successfully, failed, or were skipped
- Which conditional branch was taken after each phase (this is especially helpful when debugging conditional logic)
- The values of variables (if used in the flow)
- Number of retries and its status.
You can use this overview to validate whether your conditions behaved as expected - e.g. if the flow correctly skipped a phase on the weekend or retried a failing task.